Learning DevOps
The DevOps Culture and Infrastructure as Code practices
DevOps stands for Development and Operations. It’s a term often associated with the practices of Continuous Integration (CI) and Continuous Development (CD) and with Infrastructure as a Code (IaaC).
Getting started with DevOps
The term was introduced in 2007-2009, and the term is used to refer to the practices that aim to reduce the barrier between developers, who innovate and deliver, and operations, who want to guarantee stability.
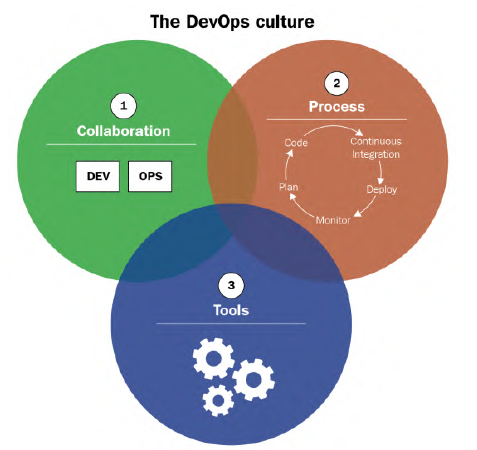
DevOps is an extension of agile processes. The collaboration between Dev and Ops is achieved by:
- More frequent application development with CI and CD.
- The implementation and automation of unit and integration tests, which can be behavior-driven design (BDD) or test-driven design (TDD).
- Collecting feedback from users.
- Monitoring applications and infrastructure.
- Collaboration.
- Processes: The DevOps process is divided into several phases that are repeated cyclically:
- Planning and prioritizing functionalities.
- Development.
- Continuous integration and delivery.
- Continuous deployment.
- Continuous monitoring.
- Tools: Choosing the right tools for the job can close the communication gaps. Developers need to use the Ops tools to detect performance problems as soon as possible, and Operations must automate the process of creating and updating the infrastructure. Furthermore, the DevOps culture can be divided into three axes: the collaboration, the process, and the tools.
Donovan Brown’s definition of DevOps is:
“DevOps is the union of people, processes, and products to enable continuous delivery of value to our end users.”
The benefits, within an enterprise, of a DevOps culture are:
- Better collaboration and communication in teams.
- Shorter production times, and thus better performance and end user satisfaction.
- Reduced infrastructure costs, thanks to IaC.
- Less time wasted, thanks to iterative cycles, which reduce application errors, and automation tools, which reduce manual tasks.
Implementing CI/CD and continuous deployment
Continuous Integration
The definition of CI, by Martin Fowler, is:
“Continuous integration is a software development practice where members of a team integrate their work frequently… Each integration is verified by an automated build (including test) to detect integration errors as quickly as possible.”
So CI is and automatic process that check that the application’s code is complete and correct every time a member makes a change.
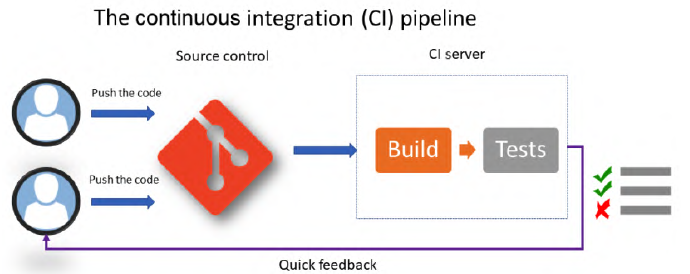
Implementing CI
To set up CI, it is necessary to have a Source Code Manager (SCM) that will centralize the code of all members, this manager can be of any types (e.g., git, SVN, etc.). It’s also important to have an automatic build manager that supports continuous integration (e.g., Jenkins, GitHub Actions, etc.).
Each team member will work on the application code daily. Then, several times a day, each team member will archive or commit their code, preferably in small commits to easily fix errors. The commits will be integrated into the rest of the code, along with other members’ commits, thanks to the CI process.
The CI server, which will execute the CI process, needs to be automated and triggered by each commit. After retrieving the code, the server will:
- Build the application package.
- Perform unit tests, and calculate code coverage. Code that is archived will not be processed by the CI process. Deactivating a test execution must be done if and only if it is necessary to deliver quickly or if the code added in the commit is not essential to the application. CI, however, cannot catch all errors, especially those that happens in production. Therefore, the time needed to fix production errors is taken from the time saved by the CI process.
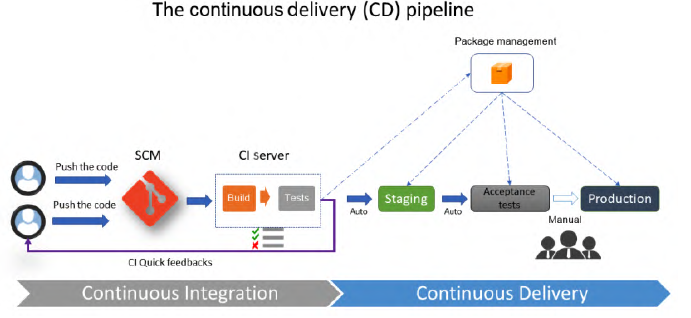
Continuous Delivery
Continuous Delivery comes after the CI process is passed, and its process is to deploy the application automatically in non-production environments (staging).
The process starts from the application package, built by CI, which will be installed through automated tasks. During this phase, it is also possible to execute functional and acceptance tests.
Unlike CI, in CD the application is tested with all of its dependencies. If the application in question is a microservice application, then:
- CI will test the single microservice in development.
- CD will test and validate the entire application, as well as the APIs.
In practice, CI and CD are linked in an integrated environment, so that the developer can execute unit tests and test the whole application. It’s important that the package generated by CI and the package installed in all the environments must be the same; however, configuration files can differ depending on the environment.
The tools necessary for CI/CD are:
- A package manager.
- A configuration manager: To manage configuration changes in CD. The deployment of the application in each staging environment can be triggered:
- Automatically: After the successful execution in the previous stage.
- Manually: In case of a sensitive environment, such as the production one, that may require manual approval from a person responsible for validating the application.
Continuous deployment
It’s an extension of CD, it consists of a process that starts with the developer’s commit and ends with the deployment in production of the change.
This practice is rarely implemented because it requires a variety of tests to guarantee that the application works. In addition, the continuous deployment process must take into account all the steps to restore the application in the event of a production problem.
It is used for:
- Toggling features: It permits toggling application’s functionalities without the need to redeploy the application.
- Blue-green production infrastructure: This infrastructure ensures no downtime during deployment. There are 2 environments, one green and one blue; first you deploy to the blue and then to the green.
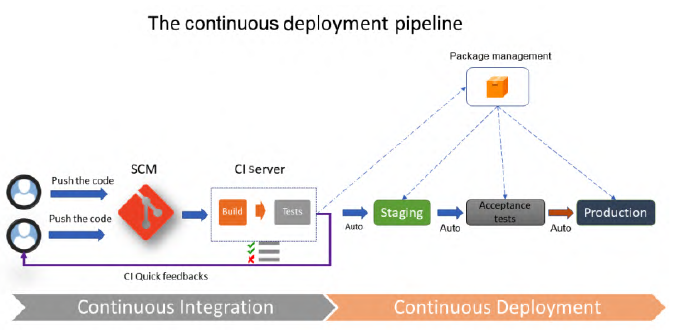
The diagram is the same as CD, but with the difference that it has an automated end-to-end deployment.
Understanding IaC practices
It’s a practice that consists of writing the code for the resources that make up an infrastructure.
This practice is widely used since:
- Deploying infrastructures manually takes a lot of time and there can many manual errors.
- Scalability is important in cloud computing.
Benefits of IaC
- Having a standard infrastructure reduces errors.
- The code that generates the infrastructure can be versioned.
- The deployment of the infrastructure is faster, thanks to the integration into the CI/CD pipeline.
- Reduced costs, management, and control.
IaC languages and tools
The languages and tools can be:
- Scripting: This category includes tools such as Bash, PowerShell and clients provided by the cloud provider. The problem with these types of tools is that they require a lot of lines of code.
- Declarative: These tools allow to define an infrastructure by writing its configuration and properties in a file. Examples are Terraform, Vagrant and Ansible.
- Programmatic: The infrastructure is programmed with a declarative language, similar to the one used by developers. Examples are Pulumi and Terraform CDK.
The IaC topology
There are various IaC typologies:
- Deploying and provisioning the infrastructure: Where you instantiate the resources that make up the infrastructure. They can be of the Platform-as-a-Service (PaaS) and the serverless resource types but also the entire network.
- Server configuration and templating: Where you configure the virtual machines. To optimize the process, it is possible to use server models, called images.
- Containerization: An alternative to deploying applications on VMs. The most used technology is Docker and the containers are configured with a Dockerfile.
- Configuration and deployment in Kubernetes: Kubernetes is a container orchestrator that deploys containers, manages the network architecture, and handles volume management. It is configured with YAML files.
Provisioning Cloud Infrastructure with Terraform
Terraform is one of the most popular tools for IaC. In this chapter we will be using Terraform with Azure.
An Azure subscription and a code editor is needed for this chapter.
Installing Terraform
Manual installation
- Reach the download page.
- Unzip and copy the binary into an execution directory.
- Add that directory to the
PATHenvironment variable.
Installation by script on Linux
The installation on Linux can be done via script or via the apt package manager:
- Script installation:
TERRAFORM_VERSION="1.0.0" #Update with your desired version curl -Os https://releases.hashicorp.com/terraform/${TERRAFORM_VERSION}/terraform_${TERRAFORM_VERSION}_linux_amd64.zip && curl -Os https://releases.hashicorp.com/terraform/${TERRAFORM_VERSION}/terraform_${TERRAFORM_VERSION}_SHA256SUMS && curl https://keybase.io/hashicorp/pgp_keys.asc | gpg --import && curl -Os https://releases.hashicorp.com/terraform/${TERRAFORM_VERSION}/terraform_${TERRAFORM_VERSION}_SHA256SUMS.sig && gpg --verify terraform_${TERRAFORM_VERSION}_SHA256SUMS.sig terraform_${TERRAFORM_VERSION}_SHA256SUMS && shasum -a 256 -c terraform_${TERRAFORM_VERSION}_SHA256SUMS 2>&1 | grep "${TERRAFORM_VERSION}_linux_amd64.zip:sOK" && unzip -o terraform_${TERRAFORM_VERSION}_linux_amd64.zip -d /usr/local/bin - With the
aptpackage manager:sudo apt-get update && sudo apt-get install -y gnupg software-properties-common curl && curl -fsSL https://apt.releases.hashicorp.com/gpg | sudo apt-key add - && sudo apt-add-repository "deb [arch=amd64] https://apt.releases.hashicorp.com $(lsb_release -cs) main" && sudo apt-get update && sudo apt-get install terraform
Terraform is already integrated into the Azure Cloud Shell. The steps to enter the shells are:
- Log in into the Azure portal.
- Open the
Cloud Shelland choose its mode: It’s either Bash or PowerShell. - Run
terraformfrom the command shell.
Configuring Terraform for Azure
To provision in a cloud infrastructure like Azure, we must first configure Terraform to allow the manipulation of resources in an Azure subscription.
To do this, we will create a new Azure Service Principal (SP) in Azure Active Directory (AD), an application user who has permission to manage Azure resources.
Creating the Azure SP
This step can be done from the portal or via script with the az cli command:
az ad sp create-for-rbac --name="<ServicePrincipal name>" --role="Contributor" --scopes="/subscriptions/<subscriptionId>"This command will return three things:
- The application ID.
- The client secret.
- The tenant ID.
The SP is created in Azure AD:

Configuring the Terraform provider
Now, we will configure our Terraform configuration to connect to Azure using this SP:
- In a directory of your choice, create the file
provider.tf(.tfis the extension for Terraform files) and paste the code:provider "azurerm" { features {} subscription_id = "<subscription ID>" client_id = "<Client ID>" client_secret = "<Client Secret>" tenant_id = "<Tenant Id>" } - Since it is not advisable to put identification information in plain text, we will improve the preceding code with:
And we will pass the identification information through environment variables:provider "azurerm" { features {} }ARM_SUBSCRIPTION_ID.ARM_CLIENT_ID.ARM_CLIENT_SECRET.ARM_TENANT_ID.
The Terraform configuration for local development and testing
To test the Terraform code quickly, it is possible to use your own Azure account. To do this, type az login before executing the code.
If there are several subscription you can use the command: az account set --subscription="<Subscription ID>"
Writing a Terraform script to deploy an Azure infrastructure
We will provide a simple Azure architecture with Terraform that is composed of the components:
- Azure resource group.
- Network configuration: Composed of virtual network and subnet.
- In this subnet, we will create a VM with a public IP address.
This code will be placed in
main.tf, in the same directory asprovider.tf.
For the resource group:
resource "azurerm_resource_group" "rg" {
	name = "bookRg"
	location = "West Europe"
	tags {
		environment = "Terraform Azure"
	}
}
Any piece of Terraform code is composed of:
- A type of
resourceordatablock. - A name of the resource to be managed (in this case
azurerm_resource_group). - An internal Terraform ID (in this case
rg). - A list of properties of the resource.
For the network interface part:
resource "azurerm_virtual_network" "vnet" {
	name = "book-vnet"
	location = "West Europe"
	address_space = ["10.0.0.0/16"]
	resource_group_name = azurerm_resource_group.rg.name
}
resource "azurerm_subnet" "subnet" {
	name = "book-subnet"
	virtual_network_name = azurerm_virtual_network.vnet.name
	resource_group_name = azurerm_resource_group.rg.name
	address_prefix = "10.0.10.0/24"
}
In this code we will create a VNet, book-vnet, and a subnet, book-subnet. We can also see that for the IDs we use pointers on the Terraform resources.
For provisioning the virtual machine we will need:
- A network interface:
resource "azurerm_network_interface" "nic" { name = "book-nic" location = "West Europe" resource_group_name = azurerm_resource_group.rg.name ip_configuration { name = "bookipconfig" subnet_id = azurerm_subnet.subnet.id private_ip_address_allocation = "Dynamic" public_ip_address_id = "azurerm_public_ip.pip.id" } } - A public IP address:
resource "azurerm_public_ip" "pip" { name = "book-ip" location = "West Europe" resource_group_name = "${azurerm_resource_group.rg.name}" public_ip_address_allocation = "Dynamic" domain_name_label = "bookdevops" } - An Azure Storage object for the diagnostics:
The type of storage, in our case, is Standard LRS.resource "azurerm_storage_account" "stor" { name = "bookstor" location = "West Europe" resource_group_name = azurerm_resource_group.rg.name account_tier = "Standard" account_replicant_type = "LRS" } - A virtual machine: We will be using an Ubuntu virtual machine:
resource "azurerm_linux_virtual_machine" "vm" {
  name = "bookvm"
  location = "West Europe"
  resource_group_name = azurerm_resource_group.rg.name
  vm_size = "Standard_DS1_v2"
  network_interface_ids = ["${azurerm_network_interface.nic.id}"]
  storage_image_reference {
	  publisher = "Canonical"
	  offer = "UbuntuServer"
	  sku = "16.04-LTS"
	  version = "latest"
  }
  ...
}
The complete source code is available here.
Following some Terraform good practices
Some good practices for writing good Terraform code are:
Separate files: Since every file with the
.tfextension in theexecutiondirectory will be automatically executed, it is good to separate the code into several files to improve readability:Rg.tf: For the resource group.Network.tf: For the VNet and subnet.Compute.tf: For the network interface, public IP, storage, and VM.
Protection of sensitive data: To store sensitive data, such as passwords, it is possible to use Azure Key Vault or HashiCorp Vault. You can then retrieve them via Terraform.
Configuration with variables and interpolation functions: Often the infrastructure that will host the application will be the same for all stages. However, some configuration may change from one stage to another. To make the code more flexible we can add variables with the following step:
- Declare the variables by adding the following code in the global Terraform code, or in a separate file
variables.tf:
variable "resource_group_name" { description = "Name of the resource group" } variable "location" { description = "Location of the resource" default = "West Europe" } variable "application_name" { description = "Name of the application" }- Initiate the values in a
.tfvarsfile namedterraform.tfvars, with the formatvariable_name = value. - Use the variables in the code with the format
var.<name of the variables>. For example:
resource "azurerm_resource_group" "rg" {
	name = var.resource_group_name
	location = var.location
	tags {
		environment = "Terraform Azure"
	}
}
In addition, it is possible to use built-in functions that can be used to manipulate data or variables.
- Declare the variables by adding the following code in the global Terraform code, or in a separate file
Running Terraform for deployment
Now that the configuration is written we can run Terraform and deploy our infrastructure.
However, it is first necessary to provide authentication with the Azure SP to ensure that Terraform can manage the Azure resources. We can do this in two ways:
- Configuring manually the environment variables needed for Terraform:
export ARM_SUBSCRIPTION_ID=xxxxx-xxxxx-xxxx-xxxx export ARM_CLIENT_ID=xxxxx-xxxxx-xxxx-xxxx export ARM_CLIENT_SECRET=xxxxxxxxxxxxxxxxxx export ARM_TENANT_ID=xxxxx-xxxxx-xxxx-xxxx - Use the
az cliwith thelogin command.
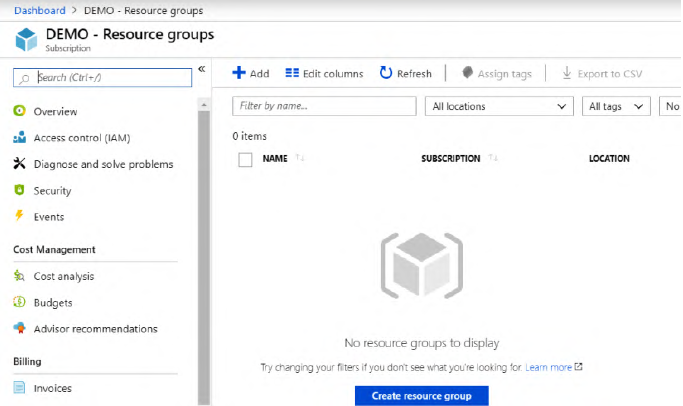
First, check that we have an empty Azure subscription without any Azure resource group:
Initialization
The initialization step does the following:
- Initialize the Terraform context and make the connection between the Terraform provider and the remote service, in this case Azure.
- Download the plugins of the providers, in this case
azurerm. - Check the code variables.
To execute the initialization, run the command:
terraform initA .terraform directory will also be created.
Previewing the changes
With the plan command it is possible to preview the changes made to the infrastructure before applying them.
Applying the changes
After previewing the changes, we can apply the changes to our infrastructure with the command apply.
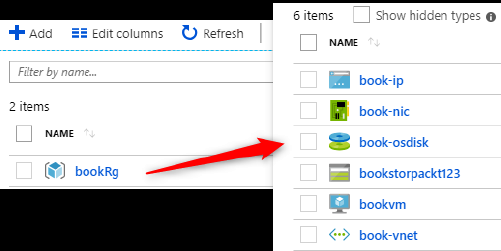
The Azure resources will look like the following:
Understanding the Terraform life cycle with different command-line options
As you might have figured out, applying changes to an infrastructure with Terraform involves three commands: init, plan and apply. But there are more commands available.
Using destroy to better rebuild
To destroy infrastructure previously built with Terraform you need to enter the command terraform destroy. This command will destroy only the resources configured in the current Terraform configuration. However, if the Terraform code provides a resource group, it will destroy all of its content.
Formatting and validating the configuration
The command terraform fmt is used to reformat the code in the .tf files.
To detect possible errors before running plan or apply, you can run the command terraform validate
The Terraform life cycle within a CI/CD process
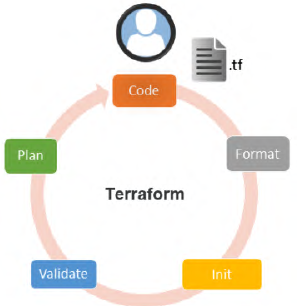
When using Terraform locally, the execution life cycle is as follows:
IaC, as applications, must be deployed or executed in an automatic CI/CD process:
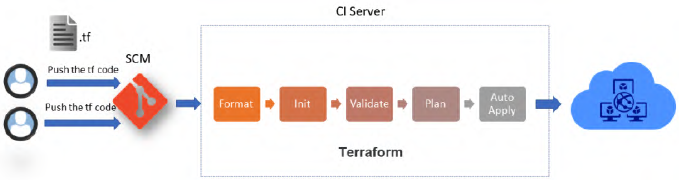
This is done with slight modifications in the:
plancommand: That will look liketerraform plan -out=out.tfplan.applycommand: That will look liketerraform apply --auto-approve out.tfplan. The option--auto-approveis also available for thedestroycommand.
Protecting the state file with a remote backend
When the command apply is executed for the first time, Terraform will create a terraform.tfstate file that contains a JSON representation of the resource properties. This file is really important and must be protected because:
- It contains the status of the infrastructure: Without it, Terraform might not behave as expected, since this file will be used to compare the changes in the resources with the command
plan. - It must be accessible, at the same time, by only the team members.
- It may contain sensitive data.
- When using multiple environments, it is necessary to be able to use multiple state files.
To solve this problem, we will store this file in a remote backend. In Azure, we will use the azurerm remote backend. To do this we will:
Create a storage account: through the portal or by
az cli:# Create Resource Group az group --name MyRgRemoteBackend --location westeurope # Create storage account az storage account create --resource-group MyRgRemoteBackend --name storageremotetf --sku Standard_LRS --encryption-services blob # Get the key ACCOUNT_KEY=$(az storage account keys list --resource-group MyRgRemoteBackend --account-name storageremotetf --query [0].value -o tsv) # Create blob container az storage container create --name tfbackends --account-name storageremotetf --account-key $ACCOUNT_KEYWrite the Terraform configuration: We configure Terraform to use the previously created remote backend:
terraform {
   backend "azurerm" {
	   storage_account_name = "storageremotetfdemo"
	   container_name = "tfbackends"
	   key = "myappli.tfstate"
	   snapshot  = true
   }
}
To pass the key value to Terraform, we need to set an
ARM_STORAGE_KEYenvironment variable with the storage account access key value.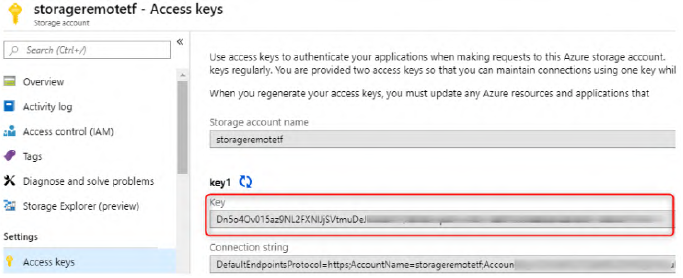
Now, the Terraform can be run with the new remote backend.
If multiple Terraform states are used to manage multiple environments, it’s possible to create several remote backend configurations with the code:
terraform {
	backend "azurerm" {}
}
And then create several backend.tfvars files that contain the properties of the backend:
storage_account_name = "storageremotetf"
container_name = "tfbackends"
key = "myappli.tfstate"
snapshot = true
To specify the backend in the init command we write:
terraform init -backend-config="backend.tfvars"Using Ansible for Configuring IaaS Infrastructure
Now that the infrastructure is provisioned, thanks to Terraform, it is necessary to configure the system and install all the necessary middleware. There are several Infrastructure as Code tools available. Ansible, from Red Hat, stands out for its many assets:
- Uses YAML language.
- Works with one executable.
- Doesn’t require agents on the VMs: It requires only a WinRM connection, for Windows VMs, or an SSH connection, for Linux VMs.
- Has a template engine and a vault to encrypt/decrypt data.
- Is idempotent.
Ansible can also be used for infrastructure provisioning, like Terraform, but with YAML configuration.
In this chapter, Ansible will be used to configure a VM with an inventory and a playbook. Technical requirements for this chapter are:
- A Linux OS.
- Python 2 or 3.
- Azure Python SDK: Since in the last section we will run the Ansible dynamic inventory for Azure. The complete source code of this chapter is available here.
Installing Ansible
Ansible can be installed on Red Hat, Debian, CentOS, macOS, and BSD systems.
To install via script on Ubuntu:
sudo apt-get update sudo apt-get install software-properties-common sudo apt-add-repository --yes --update ppa:ansible/ansible sudo apt-get install ansibleNo installation is required in the Azure Cloud Shell because Ansible is already installed.
Ansible artifacts
To configure a system you need artifacts:
- The host: the target system that Ansible will configure.
- The inventory: an INI or YAML file that contains the list of target hosts that Ansible will perform configuration actions on.
- The playbook: the Ansible configuration script that will be executed to configure hosts.
Ansible configuration is in the file /etc/ansible/ansible.cfg. You can view the configuration with ansible-config view.
Creating an Ansible inventory
The inventory is a file that contains the list of hosts that Ansible will perform administration and configuration actions on. It can be:
- Static inventory: If you know the addresses of the hosts, list them in an INI or YAML file.
- Dynamic inventory: If you don’t have the addresses, the list can be generated by an external script.
The inventory file
The list of the hosts can be composed of an IP address or a Fully Qualified Domain Name (FQDN). A configuration example of this file can be found here: /etc/ansible/hosts.
The steps required to create an inventory are:
- Create and enter the working directory.
- Create a file
myinventory(with no extension) and write down the hosts. For example:192.10.14.10 mywebserver.enterprise.com localhost
However, especially in an enterprise, you can organize the hosts (often VMs in an enterprise) into groups using square brackets []:
[webserver]
192.10.20.31
mywebserver.enterprise.com
[database]
192.30.34.30
Configuring hosts in the inventory
Since ansible.cfg is generic and applies to all executions, we need to override its settings for specific hosts:
ansible_user: The user who connects to the remote host.ansible_port: Used to change the default SSH port value.ansible_host: Alias for the host.ansible_connection: The type of connection (paramiko, ssh, or local).ansible_private_key_file: The private key used to connect to the remote host.
An example inventory with two web servers and two databases split into dev and qa groups is:
[webserver]
webserver1 ansible_host=192.10.20.31 ansible_port=2222
webserver2 ansible_host=192.10.20.31 ansible_port=2222
[database]
database1 ansible_host=192.20.34.20
ansible_user=databaseuser
database2 ansible_host=192.20.34.21
ansible_user=databaseuser
[dev]
webserver1
database1
[qa]
webserver2
database2webserver1, webserver2, database1, and database2 are called alias.
Testing the inventory
To test whether all hosts are accessible by Ansible, run:
ansible -i inventory all -u demobook -m pingWhere:
-i: Path to the inventory file.-u: Remote username.-m: Command to execute.
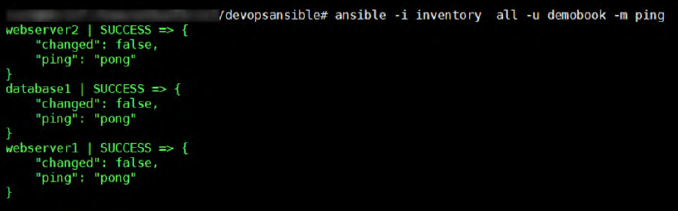
To test connectivity for a single group, replace all with the group name
Executing the first playbook
Writing a basic playbook
The code of the playbook is written in YAML. To install an NGINX server on an Ubuntu VM: in the same directory as the inventory file, create a playbook.yml file and write:
---
- hosts: all
	tasks:
	- name: install and check nginx latest version
		apt: name=nginx state=latest
	- name: start nginx
		service:
		name: nginx
		state: started
---
In detail:
- YAML files start and end with the optional
---. hosts: allspecifies that the configuration will be applied to every host in the inventory file.tasks:defines a list of tasks that will be executed. Every task has anameproperty that serves as a label. Under the name we call the function to be executed using Ansible modules. We use two modules:apt: To install the latest nginx package.service: To start the nginx service.
Note that you don’t need any knowledge of development or IT scripting: you only need to know the list of actions you can perform on VMs to configure them.
Understanding Ansible modules
There are more than 200 modules provided by Ansible. The complete list can be found here.
You can also create custom modules and publish them in a private registry internally. More information here.
Improving your playbooks with roles
When you need to repeat a task for each application, you can encapsulate the playbook code in a directory called a role that can be used by several playbooks.
To create the nginx role corresponding to the example, create the file main.yml:
devopsansible/
├── inventory
├── Playbook.yml
└── roles/
   └── nginx/
       └── tasks/
           └── main.yml
And write:
- name: install and check nginx latest version
	apt: name=nginx state=latest
- name: start nginx
	service:
	name: nginx
	state: started
Now, in the Playbook.yml file, we can simply write:
---
- hosts: webserver
	roles:
		- nginx
---
The nginx role is now centralized and the same code can be used in several playbooks.
Before creating our own roles, it’s better to check Ansible Galaxy. This website contains a large number of roles provided by the community.
Executing Ansible
The execution of the Ansible playbook is done with:
ansible-playbook -i inventory playbook.yml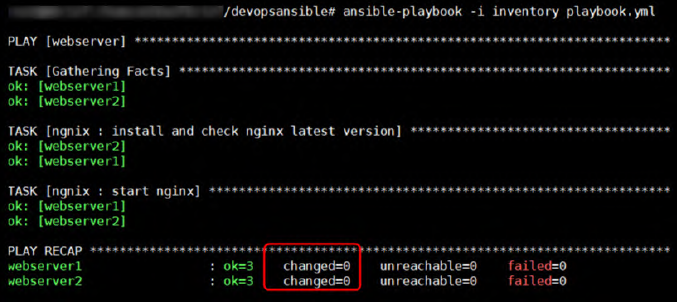
The PLAY RECAP will show the status of the hosts:
ok: The number of playbook tasks that have been successfully executed.changed: The number of changes that were (or would be) applied.unreachable: The host was unreachable.failed: The execution failed on the host.
Using the preview or dry run option
By adding the option --check, Ansible does not apply configuration changes to the host. This allows us to preview the changes that would be made to the hosts.
Another important tool for checking a playbook before applying it is Vagrant by HashiCorp. Vagrant allows us to create a local test environment composed of VMs to test the effects of our playbook.
Increasing the log level output
In case of errors, you can add more logs by using these options:
-v: Basic verbose mode.-vvv: More verbose output.-vvvv: Most verbose output, including connection debugging information.
Protecting data with Ansible Vault
Using variables in Ansible for better configuration
When having multiple environments, we can differentiate the properties of the infrastructure by using variables.
Variables are used by writing {{ variable_name }} and can be declared and initialized in two ways:
Inside a
vars:block: The variable can be accessed by everything that is nested. For example:- name: Install required software apt: name="{{ packages }}" state=present vars: packages: - python-mysqldb - mysql-serverIn this case the variable
packagescan’t be accessed by something outside theaptmodule.Inside the
group_vars/<group name>: This way we can dynamically instantiate variables based on which group (inventory group) the host is assigned. For example: to declare the variablesmysql_userandmysql_passwordfor hosts in thedatabasegroup we write:# /group_vars/database/main.yml --- mysql_user: mydbuserdef mysql_password: mydbpassworddef
More information can be found here.
Protecting sensitive data with Ansible Vault
To encrypt sensitive data, for example the username and password of a database stored in group_vars/database/main.yml, you can write:
ansible-vault encrypt group_vars/database/main.ymlAnsible will ask for a password that will be needed to decrypt the file. Now the file is no longer readable, you can decrypt it with the command:
ansible-vault dencrypt group_vars/database/main.ymlYou can also store the password in a .txt file located somewhere safe (and not committed) so you don’t need to type the password:
ansible-vault encrypt group_vars/database/main.yml --vault-password-file ~/.vault_pass.txtNow the Ansible playbook can be executed in two ways:
ansible-playbook -i inventory playbook.yml --ask-vault-pass # Interactive mode
ansible-playbook -i inventory playbook.yml --vault-password-file ~/.vault_pass.txt # Automatic mode
Using dynamic inventory for an Azure infrastructure
In this section we will look at the different ways to use Ansible to configure VMs in Azure.
The first thing to do is create an Azure Service Principal in Azure AD, like we did with Terraform. Then we must export the variables:
export AZURE_SUBSCRIPTION_ID=<subscription_id>
export AZURE_CLIENT_ID=<client ID>
export AZURE_SECRET=<client Secret>
export AZURE_TENANT=<tenant ID>
To generate an inventory with groups we will add tags to the VM. To add a tag via command line:
az resource tag --tags role=webserver -n VM01 -g demoAnsible --resource-type "Microsoft.Compute/virtualMachines"This script adds a role tag with the value webserver to the VM01 VM.
Install the Ansible Azure collection with the command:
ansible-galaxy collection install azure.azcollectionThen, in a file named inv.azure_rm.yml, write:
plugin: azure_rm # Use the installed plugin
include_vm_resource_groups:
  - demoAnsible # Use only the demoAnsible resource group
auth_source: auto
keyed_groups:
  - key: tags.role # Group the VMs by tag
leading_separator: false
To display the inventory script in list format type:
ansible-inventory -i inv.azure_rm.yml --list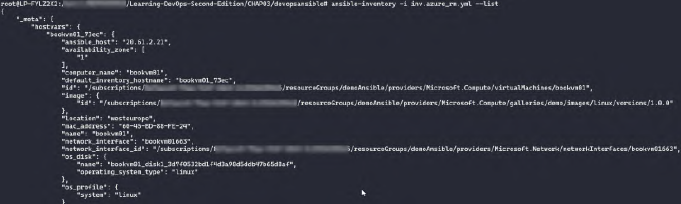
Now that we have verified that the dynamic inventory work, we can execute the playbook with the command:
ansible-playbook playbook.yaml -i inv.azurerm.yml -u demobook –ask-passBy using a dynamic inventory, we can take full advantage of the scalability of the cloud with an automatic VM configuration and without having to make any code changes.
Optimizing Infrastructure Deployment with Packer
Since configuring a VM can be time-consuming and, between each environment or application, there can be middleware with different versions, we will generate a VM image that contains all the configurations of the VMs. The benefits of this method are:
- The provisioning is very fast.
- Each VM is uniform in configuration and safe.
One tool that allows one to create VM images from a file is Packer, from the HashiCorp tools. Technical requirements for this chapter are:
- An Azure Subscription.
- Ansible.
- Terraform.
An overview of Packer
Packer allows one to build custom VM images from any OS (called a template). The VM image configuration is done using a JSON file.
Packer also provides other types of images, for example, Docker and Vagrant.
Installing Packer
The installation process is similar to Terraform’s. It can be done manually or by script.
Installing manually
Go to the download page and download the package corresponding to your operating system. Unzip, copy the binary into an execution directory, and then update the PATH environment variable.
Installing by script
To install Packer 1.7.3 on Linux, the script is:
PACKER_VERSION="1.7.3" #Update with your desired version
curl -Os https://releases.hashicorp.com/packer/${PACKER_VERSION}/packer_${PACKER_VERSION}_linux_amd64.zip
&& curl -Os https://releases.hashicorp.com/packer/${PACKER_VERSION}/packer_${PACKER_VERSION}_SHA256SUMS
&& curl https://keybase.io/hashicorp/pgp_keys.asc | gpg --import
&& curl -Os https://releases.hashicorp.com/ packer/${PACKER_VERSION}/packer_${PACKER_VERSION}_SHA256SUMS.sig
&& gpg --verify packer_${PACKER_VERSION}_SHA256SUMS.sig packer_${PACKER_VERSION}_SHA256SUMS
&& shasum -a 256 -c packer_${PACKER_VERSION}_SHA256SUMS 2>&1 | grep "${PACKER_VERSION}_linux_amd64.zip:sOK"
&& unzip -o packer_${PACKER_VERSION}_linux_amd64.zip -d /usr/local/bin
If you have the apt package manager, you can just add a repository:
sudo apt-get update && sudo apt-get install -y gnupg software-properties-common curl
&& curl -fsSL https://apt.releases.hashicorp.com/gpg | sudo apt-key add -
&& sudo apt-add-repository "deb [arch=amd64] https://apt.releases.hashicorp.com $(lsb_release -cs) main"
&& sudo apt-get update && sudo apt-get install packer
Packer is already installed in the Azure Cloud Shell.
Creating Packer templates for Azure VMs with scripts
The structure of the Packer template
Packer’s template can be written both in JSON and HCL (HashiCorp Language). The structure of a JSON template is:
{
	"variables": {
		// list of variables
	},
	"builders": [
		{
			// builders properties
		}
	],
	"provisioners": [
		{
			// list of scripts to execute for image provisioning
		}
	]
}
A Packer template is composed of several main sections:
builders.provisioners.variables.
The builders section
This section contains all the properties that define the image and its location. An example of a builders section:
{
	"builders": [{
		"type": "azure-rm",
		"client-id": "xxxxxxxx",
		"client-secret": "xxxxxxxx",
		"subscription_id": "xxxxxxxxxx",
		"tenant_id": "xxxxxx",
		"os_type": "Linux",
		"image_publisher": "Canonical",
		"image_offer": "UbuntuServer",
		"location": "westus",
		.......
	}]
}
To create the same image for several providers, we can indicate multiple blocks inside the builders section.
The provisioners section
It’s an optional section that contains a list of scripts that will be executed by Packer on a temporary VM base image to build our custom VM image. An example of a provisioners section:
{
	...
	"provisioners": [
		{
			"type": "shell",
			"script": "hardening-config.sh"
		},
		{
			"type": "file",
			"source": "scripts/installers",
			"destinarion": "/tmp/scripts"
		}
	]
	...
}
In this example, Packer will:
- Execute the
hardening-config.shscript. - Copy
scripts/installersinto/tmp/scripts.
When creating VM images, it’s important to generalize the image and delete all personal user information used to create the image. When creating a Windows VM image, the last step will be calling the Sysprep tool:
"provisioners": [
	{
		"type": "powershell",
		"inline": ["& C:\windows\System32\Sysprep\Sysprep.exe /oobe /generalize /shutdown /quiet"]}
	}
]
When on Linux, we will use the following code:
"provisioners": [
	.....
	{
		"type": "shell",
		"execute_command": "sudo sh -c '{{ .Vars }} {{ .Path }}'",
		"inline": [
			"/usr/sbin/waagent -force -deprovision+user && export HISTSIZE=0 && sync"
		]
	}
]
The variables section
It’s an optional section used to define variables that will be filled either as command-line arguments or as environment variables. These variables will then be used in the builders or provisioners sections. An example of a variables section:
{
	"variables": {
		"access_key": "{{env 'ACCESS_KEY'}}",
		"image_folder": "/image",
		"vm_size": "Standard_DS2_v2"
	},
	...
}
In this example:
- The
acces_keyvariable is initialized with the value of theACCESS_KEYenvironment variable. - The
image_foldervariable is initialized with the value/image. - The
vm_sizevariable is initialized with the valueStandard_DS2_v2.
These variables can then be used in other sections with the syntax: {{user 'variablename'}}.
Apart from the variables provided by the user, it is also possible to retrieve variables from other variable sources, such as secrets stored in HashiCorp Vault. Documentation here.
Building an Azure image with the Packer template
After creating an Azure AD Service Principal (SP) for Packer, we can now build a VM image in Azure.
In a file named azure_linux.json, write:
{
	"variables": {
		"subscriptionid": "{{env 'AZURE_SUBSCRIPTION_ID'}}",
		"clientid": "{{env 'AZURE_CLIENT_ID'}}",
		"clientsecret": "{{env 'AZURE_CLIENT_SECRET'}}",
		"tenantid": "{{env 'AZURE_TENANT_ID'}}",
		"resource_group": "rg_images",
		"image_name": "linuxWeb",
		"image_version": "0.0.1"
	},
	"builders": [
		{
			"type": "azure-arm",
			"client_id": "{{user 'clientid'}}",
			"client_secret": "{{user 'clientsecret'}}",
			"subscription_id": "{{user 'subscriptionid'}}",
			"tenant_id": "{{user 'tenantid'}}",

			"os_type": "Linux",
			"image_publisher": "Canonical",
			"image_offer": "UbuntuServer",
			"image_sku": "18.04-LTS",
			"location": "West Europe",
			"vm_size": "Standard_DS2_v3",

			"managed_image_resource_group_name": "{{user 'resource_group'}}",
			"managed_image_name": "{{user 'image_name'}}-{{user 'image_version'}}",
			"azure_tags": {
				"version": "{{user 'image_version'}}",
				"role": "WebServer"
			}
		}
	],
	"provisioners": [
		{
			"type": "shell",
			"execute_command": "sudo sh -c '{{ .Vars }} {{ .Path }}'",
			"inline": ["apt-get update", "apt-get -y install nginx"]
		},
		{
			"type": "shell",
			"execute_command": "sudo sh -c '{{ .Vars }} {{ .Path }}'",
			"inline": ["/usr/sbin/waagent -force -deprovision+user && export HISTSIZE=0 && sync"]
		}
	]
}
In the variables section:
- We create variables with authentication information from the Service Principal (SP) that will be passed either via command line or as environment variables.
- We define additional variables for the resource group, image name, size, region, and image version.
In the builders section:
- We specify the Azure provider and SP authentication details. For security reasons, these values are written in variables.
- The
managed_image_resource_group_nameandmanaged_image_namevariables indicates the resource group and the name of the image to be created. - We define properties corresponding to the OS, size, region, etc.
In the provisioners section:
- We update and upgrade our packages, then we install NGINX.
- As our last step, the VM is deprovisioned to delete the user information that was used to install everything on the temporary VM. The command used to do this is:
/usr/sbin/waagent -force -deprovision+user && export HISTSIZE=0 && sync.
Using Ansible in a Packer template
It’s also possible to use Ansible playbooks to create an image. It’s interesting to note that the same playbooks we used to configure the VMs can be used to create the VM image.
Writing the Ansible playbook
The playbook is:
---
- hosts: 127.0.0.1
  become: true
  connection: local
  tasks:
    - name: installing Ngnix latest version
      apt:
        name: nginx
        state: latest
    - name: starting Nginx service
      service:
        name: nginx
        state: started
The changes that were made are:
- No inventory file, since Packer manages the remote host.
- The host is
localhost.
Integrating an Ansible playbook in a Packer template
Now that the playbook is written, we need to change the provisioners section:
"provisioners": [
	{
		"type": "shell",
		"execute_command": "sudo sh -c '{{ .Vars }} {{ .Path }}'",
		"inline": [
			"add-apt-repository ppa:ansible/ansible",
			"apt-get update",
			"apt-get install ansible -y"
		]
	},
	{
		"type": "ansible-local",
		"playbook_file": "ansible/playbookdemo.yml"
	},
	{
		"type": "shell",
		"execute_command": "sudo sh -c '{{ .Vars }} {{ .Path }}'",
		"script": "clean.sh"
	},
	// Deprovision the VM
]
In this section we:
- Install Ansible in the temporary VM.
- Use the
ansible-localprovisioner to run theplaybookdemo.yml, which will install and start NGINX. Documentation of the provisioner here - Execute the
clean.shscript to delete Ansible and its dependent packages - Deprovision the VM (omitted)
It’s also possible to run the Ansible playbook remotely, rather than in a temporary VM. Documentation available here.
Executing Packer
The next step is to generate a custom VM image, which will be used to quickly provision VMs that are already configured and ready to use for your applications. The flow of operations is:
- Packer creates a temporary VM.
- Packer performs all configuration actions described in the JSON template.
- Packer generates the image from the VM.
- Packer deletes the temporary VM and all its dependencies.
To generate a VM image for Azure, follow these steps
- Configure Packer to authenticate to Azure.
- Check the Packer template
- Run Packer to generate our image.
To generate a VM image for Azure, follow these steps:
Configure Packer to authenticate to Azure: We do this by setting up the environment variables with the command:
export ARM_SUBSCRIPTION_ID=<subscription_id>
export ARM_CLIENT_ID=<client ID>
export ARM_SECRET_SECRET=<client Secret>
export ARM_TENANT_ID=<tenant ID>
Check the Packer template: We can check the correctness and validity of the Packer template with:
packer validate azure_linux.jsonRun Packer to generate our image: The command to generate the VM image is:
packer build azure_linux.json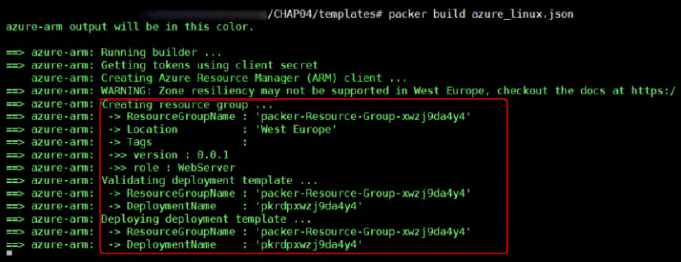
In the Azure portal it’s possible to see the temporary resource group being created:
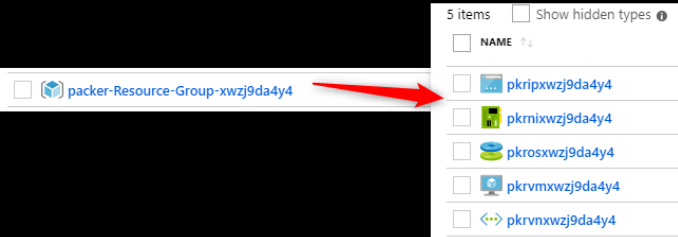
After that it’s possible to see the deletion of the temporary VM and in the Azure portal a VM image named
linuxWeb-0.0.1will be present.To pass values via command line, for example to change the image version, run the command:
packer build --var 'image_version=0.0.2' azure_linux.json
Writing Packer templates with HCL format
From version 1.5 it is possible to write the template in HCL instead of JSON. From version 1.7 it will be preferred to use the HCL syntax.
The HCL format is similar to the JSON one, it’s composed of variable, source, build, and provisioner blocks. For writing an HCL template, create a file named .pkr.hcl and write:
packer {
	required_plugins
	{
		azure =
		{
			version = ">= 1.0.0"
			source  = "github.com/hashicorp/azure"
		}
	}
}

variable "image_folder" {
	default = "/image"
}
variable "vm_size" {
	default = "Standard_DS2_v2"
}

Source "name" {
	...
}
Build {
	Source = []
	Provisioner "" {}
}
In the variable block we declare user variables, for example Azure credentials, VM name, etc.
In the source block we declare the properties of the target image to build an Azure image or Docker image. Two examples of source blocks are:
- Azure VM:
source "azure-arm" "azurevm" { os_type = "Linux" location = "West Europe" vm_size = "Standard_DS2_V2" ... } - Docker image:
source "docker" "docker-img" {
  image = "ubuntu"
  export_path = "imagedocker.tar"
}
In the build block we put the source list to use and the provisioner scripts for configuring the images. An example of build block is:
build {
	sources = ["sources.azure-arm.azurevm","sources.docker.docker-img"]
	provisioner "shell" {
		inline = [
			"apt-get update",
			"apt-get -y install nginx"
		]
		execute_command = "chmod +x {{ .Path }}; {{ .Vars }} sudo -E sh '{{ .Path }}'"
		inline_shebang = "/bin/sh -x"
	}
	provisioner "shell" {
		inline = [
			"sleep 30",
			"/usr/sbin/waagent -force -deprovision+user && export HISTSIZE=0 && sync"
		]
		execute_command = "chmod +x {{ .Path }}; {{ .Vars }} sudo -E sh '{{ .Path }}'"
		inline_shebang = "/bin/sh -x"
	}
}
The conversion of our previous JSON template is available here.
Finally, to execute the HCL template:
packer init .pkr.hcl # Download plugins
packer validate .pkr.hcl # Validate the template
packer build .pkr.hcl # Build the desired image
The documentation to migrate from JSON to HCL format is available here.
Using Packer image with Terraform
Now that the VM image is built, we have to tell Terraform to retrieve and use it.
In the compute.tf script, point to Terraform where the VM image is located:
data "azurerm_image" "customnginx" {
	name = "linuxWeb-0.0.1"
	resource_group_name = "rg_images"
}
To use the image:
resource "azurerm_virtual_machine" "vm" {
	...
	## USE THE CUSTOM IMAGE
	storage_image_reference {
		id = "${data.azurerm_image.customngnix.id}"
	}
	...
}
The full compute.tf is available here
Authoring the Development Environment with Vagrant
Now that we have built the VM image, the next step is to automate the testing of it through Vagrant. Technical requirements for this chapter are:
- VirtualBox as a VM hypervisor.
- On Windows, disable Hyper-V.
Installing Vagrant
The installation on Windows can be done by downloading this MSI package.
On Linux the installation is done by script:
sudo apt-get update && sudo apt-get install -y gnupg software-properties-common curl
&& curl -fsSL https://apt.releases.hashicorp.com/gpg | sudo apt-key add -
&& sudo apt-add-repository "deb [arch=amd64] https://apt.releases.hashicorp.com $(lsb_release -cs) main"
&& sudo apt-get update && sudo apt-get install vagrant
Writing a Vagrant configuration file
The important elements of Vagrant are:
- Vagrant binary: The one that we installed earlier.
- Base image of the VM: Called Vagrant Boxes. This image can be public or local on the machine.
- Configuration file.
Using Vagrant Cloud for Vagrant Boxes
HashiCorp has set up a portal where you can publish and share images of VMs that are compatible with Vagrant.
In the portal you can search your image according to various criteria. Once you have found the image (in our case ubuntu/bionic64), click on the box to see the configuration details.
Writing the Vagrant configuration file
In the configuration file we need to specify:
- The box to use.
- The hardware configuration: Such as RAM and CPU.
- The network configuration.
- The script for provisioning and configuration.
- The local folder that will be shared with the VM.
To create a Vagrant configuration:
- Create a folder named
VagrantFiles. - Inside, type the command:
This will create a file namedvagrant init ubuntu/bionic64Vagrantfilefor anubuntu/bionic64VM. - Create a new folder, inside
VagrantFiles, calledscriptsand inside create a file namedansible.shthat will contain the script to install Ansible:apt-get update sudo apt-get --assume-yes install software-properties-common sudo apt-add-repository --yes --update ppa:ansible/ansible sudo apt-get --assume-yes install ansible - In the
Vagrantfileadd the line, right before theend:config.vm.provision "shell", path: "scripts/ansible.sh" - To test the local Ansible playbook, we need to share the local directory with the VM. Add the following line right before the
end:config.vm.synced_folder "C:\<path>\devopsansible", "/learningdevops"
To validate the configuration run:
vagrant validateUseful resources
- Installation guides since book installation instructions may be outdated.
- Terraform Azure provider.
- Terraform registry.